준비사항
- 서버 3대 준비
| SERVER | IP | ROLE | HARDWARE |
| k8s-master | 10.10.0.101 | Control plane(master node) | cpu 2개, memory 2G, disk 50G |
| k8s-node1 | 10.10.0.102 | Worker node | |
| k8s-node2 | 10.10.0.103 |
0. Docker(도커) 설치
- 도커 설치는 아래 글 참고하시기 바랍니다.
[Docker/도커] 설치
CentOS stream 9 버전에서 설치를 진행했습니다. 1. Docker(도커) 설치설치는 공식 홈페이지를 참고하여 작성했습니다.Install Docker Engine on CentOS | Docker Docs Install Docker Engine on CentOSLearn how to install Docker E
khk92.tistory.com
1. 서버 설정 (공통)
- 설치는 공식 홈페이지를 참고하여 작성했습니다.
1.1) swap 비활성화
# swapoff -a
# sed -i '/ swap / s/^\(.*\)$/#\1/g' /etc/fstab
1.2 selinux 변경
# setenforce 0
# sed -i 's/^SELINUX=enforcing$/SELINUX=permissive/' /etc/selinux/config
# sestatus
1.3) hosts 변경
# cat << EOF >> /etc/hosts
> 10.10.0.101 k8s-master
> 10.10.0.102 k8s-node1
> 10.10.0.103 k8s-node2
EOF
1.4) 방화벽 허용
[Control-plane]
# firewall-cmd --permanent --add-port=6443/tcp
# firewall-cmd --permanent --add-port=2379-2380/tcp
# firewall-cmd --permanent --add-port=10250/tcp
# firewall-cmd --permanent --add-port=10257/tcp
# firewall-cmd --permanent --add-port=10259/tcp
# firewall-cmd --reload
[Worker-node]
# firewall-cmd --permanent --add-port=10250/tcp
# firewall-cmd --permanent --add-port=30000-32767/tcp
# firewall-cmd --reload
*참고: master-node와 worker-node 방화벽 허용 포트가 다릅니다.
1.5) IPv4 패킷 전달 수동으로 활성화
# cat <<EOF | sudo tee /etc/sysctl.d/k8s.conf
>net.ipv4.ip_forward = 1
>net.bridge.bridge-nf-call-ip6tables = 1
>net.bridge.bridge-nf-call-iptables = 1
>EOF
# cat <<EOF | sudo tee /etc/modules-load.d/k8s.conf # pod끼리 통신 가능하도록 설정
>br_netfilter
# sudo sysctl --system
2. Kubernetes 설치 (공통)
2.1) Kubernetes Repository 설정
# cat <<EOF | sudo tee /etc/yum.repos.d/kubernetes.repo
[kubernetes]
name=Kubernetes
baseurl=https://packages.cloud.google.com/yum/repos/kubernetes-el7-\$basearch
enabled=1
gpgcheck=1
gpgkey=https://packages.cloud.google.com/yum/doc/yum-key.gpg https://packages.cloud.google.com/yum/doc/rpm-package-key.gpg
exclude=kubelet kubeadm kubectl
EOF
2.2) Kubernetes 설치
# yum install -y kubelet kubeadm kubectl --disableexcludes=kubernetes
설치가 안된다!
https://packages.cloud.google.com/yum/repos/kubernetes-el7-x864_64 관련해서 404 not found 에러가 뜨는데
조사해보니 해당 repo 주소가 2024년1월인가 종료되고 주소가 변경되었다고한다
[kubernetes]
name=Kubernetes
baseurl=https://pkgs.k8s.io/core:/stable:/v1.29/rpm/
enabled=1
gpgcheck=1
gpgkey=https://pkgs.k8s.io/core:/stable:/v1.29/rpm/repodata/repomd.xml.key
exclude=kubelet kubeadm kubectl
위 내용으로 repo 수정하여 다시 설치
# yum install -y kubelet kubeadm kubectl --disableexcludes=kubernetes
# systemctl enable kubelet
# systemctl start kubelet
- repo 변경된 내용 아래 참고
Linux에서 kubectl 설치 및 설정 | 쿠버네티스 (kubernetes.io)
Install and Set Up kubectl on Linux
Before you begin You must use a kubectl version that is within one minor version difference of your cluster. For example, a v1.30 client can communicate with v1.29, v1.30, and v1.31 control planes. Using the latest compatible version of kubectl helps avoid
kubernetes.io
3. CRI 설치 (공통)
- 쿠버네티스의 컨테이너 런타임으로 도커 엔진을 사용하려면 cri-dockerd를 설치해야한다.
도커 엔진의 컨테이너 런타임이 CRI를 만족하지 않기 때문이다. - CRI로 저는 cri-dockerd를 설치하겠습니다.
- 아래 링크 참고하여 작성했습니다.
설치 | cri-dockerd (mirantis.github.io)
Install
The easiest way to install cri-dockerd is to use one of the pre-built binaries or packages from the releases page. There are numerous supported platforms and using a pre-built package will install the binary and setup your system to run it as a service.
mirantis.github.io
3.1) 설치
# dnf install -y go-toolset # go 설치
# git clone https://github.com/Mirantis/cri-dockerd.git
# cd cri-dockerd
# mkdir bin
# go build -o bin/cri-dockerd
# mkdir -p /usr/local/bin
# install -o root -g root -m 0755 bin/cri-dockerd /usr/local/bin/cri-dockerd
# install packaging/systemd/* /etc/systemd/system
# sed -i -e 's,/usr/bin/cri-dockerd,/usr/local/bin/cri-dockerd,' /etc/systemd/system/cri-docker.service
# systemctl daemon-reload
# systemctl enable cri-docker.service
# systemctl enable --now cri-docker.socket
# systemctl start cri-docker.service
4. Master-node 구축
4.1) kubeadm 초기화
# kubeadm init --pod-network-cidr=10.244.0.0/16 # 뒤에 CNI 를 설치하기 위해 설정을 해줘야함
# flannel 의 기본 cidr 설정값 10.244.0.0/16
에러발생
Found multiple CRI endpoints on the host. Please define which one do you wish to use by setting the 'criSocket' field in the kubeadm configuration file: unix:///var/run/containerd/containerd.sock, unix:///var/run/cri-dockerd.sock
소켓이 2개라 하나 지정해줘야합니다.
# kubeadm init --pod-network-cidr=10.244.0.0/16 --cri-socket /var/run/cri-dockerd.sock
- 아래 완료 화면

4.2) CNI (Flannel) 구축
- 설치 관련 링크
애드온 설치 | 쿠버네티스 (kubernetes.io)
Installing Addons
Note: This section links to third party projects that provide functionality required by Kubernetes. The Kubernetes project authors aren't responsible for these projects, which are listed alphabetically. To add a project to this list, read the content gui
kubernetes.io
- CNI 플러그인을 설치해야 모든 pod가 서로 직접 통신이 가능하다.
# kubectl apply -f https://github.com/flannel-io/flannel/releases/latest/download/kube-flannel.yml
에러 발생

root 유저: export KUBECONFIG=/etc/kubernetes/admin.conf 명령어로 환경변수를 등록
일반 유저: kuberadmin init 명령어 후 .kube 디렉토리 및 config 생성 명령어 실행 아래참고
(export 등록은 로그아웃 한 경우 초기화되어 root도 일반 유저대로 생성해도 됨)
# mkdir -p $HOME/.kube
# sudo cp -i /etc/kubernetes/admin.conf $HOME/.kube/config
# sudo chown $(id -u):$(id -g) $HOME/.kube/config
다시 실행
# kubectl apply -f https://github.com/flannel-io/flannel/releases/latest/download/kube-flannel.yml
# kubectl get pod --all-namespaces #실행 확인, STATUS가 Running이면 정상

5. Worker-node 구축
5.1) Worker-node 조인
- Master-node에서 아래 명령어 수행 후 나오는 내용 Worker-node에서 수행
# kubeadm token create --print-join-command

# [worker-node1]# kubeadm join 10.10.0.101:6443 --token jkpuin.oax3hyquuroviu02 --discovery-token-ca-cert-hash sha256:18786df98fe9bfed796bc1252980374295cb898e3b94b10f58cfc9fe27bd6173
d
- Master-node에서 확인

5.2) admin.conf 배포
- woker-node에서 'kubectl get nodes' 명령어를 사용하면 에러가 발생합니다.
이를 위해서 master에 있는 admin.conf 파일을 worker-node로 배포해 주어야 합니다.
# mkdir -p $HOME/.kube
# scp [master IP]:/etc/kubernetes/admin.conf $HOME/.kube/config
5.3) 정상 확인
- kubectl get nodes 명령어 시 정상 확인

6. 테스트 - nginx 배포
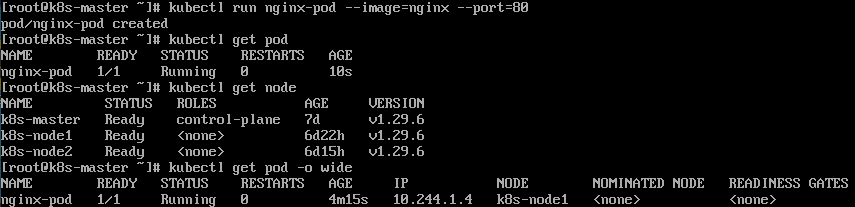
6.1) nginx 컨테이너 실행
# kubectl run nginx-pod --image=nginx --port=803)
- 생성 확인
- 어떤 worker node에서 실행 중인지 확인하려면 kubectl get pods -o wide 로 가능
6.2) 통신 확인
# curl 10.244.1.4
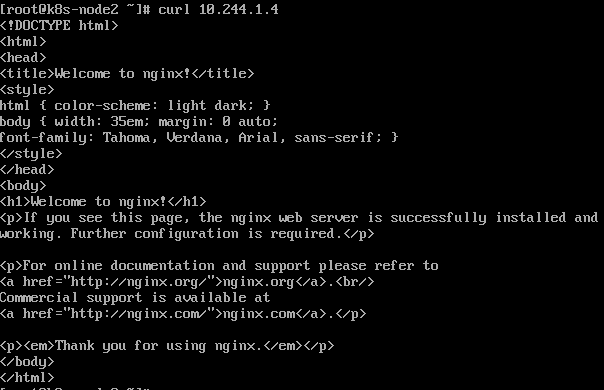
- 방화벽을 올리고 구축을 했는데 방화벽 사용 시에는 통신확인이 안된다...
방화벽을 끈 후에는 위처럼 정상통신이 되는게 확인되었다.
방화벽 설정을 다시 해봐야겠다..
설치 끝!
'IT > Kubernetes' 카테고리의 다른 글
| [kubernetes/쿠버네티스] Prometheus & Grafana 설치 (2) | 2024.07.24 |
|---|---|
| [Kubernetes/쿠버네티스] pod 동작 flow (0) | 2024.07.23 |
| [kubernetes/쿠버네티스] nginx 서버 배포하기 (0) | 2024.07.05 |
| [kubernetes/쿠버네티스] 명령어 자동완성 설정 (0) | 2024.06.21 |
| [kubernetes/쿠버네티스] pod 관리 명령어 (0) | 2024.06.21 |