실습 환경
● Virtualbox 가상화 환경
● CentOS stream 9 서버 2대
| SERVER | IP |
| ha-node1 | 10.10.0.150 |
| ha-node2 | 10.10.0.151 |
1. pacemaker 설치
1.1) hosts 등록
[root@ha-node1 ~]# vi /etc/hosts
10.10.0.150 ha-node1
10.10.0.151 ha-node2
10.10.0.152 ha-vip
1.2) pacemaker 설치
[root@ha-node1 ~]# dnf install -y pacemaker pcs corosync

# 인터넷이 정상적으로 연결되어 있는데 pacemaker pcs corosync 설치 시 계속해서 찾을 수 없다고 나타났다...
# 이것저것 찾아보다가 /etc/yum.repo.d/centos-addons.repo 파일을 수정해주었더니 해결


# systemctl start pcsd.service # pcsd는 pacemaker, corosync 관리/설정 데몬
# systemctl enable pcsd.service
2. 환경 설정
2.1) 계정 패스워드 설정
● pacemaker 설치 시 자동으로 생성되는 hacluster 계정의 패스워드를 설정
[root@ha-node1 ~]# passwd hacluster
2.2) Cluster 설정 (node1에서만 실행)
[root@ha-node1 ~]# pcs host auth host1 host2 # 클러스터 인증

[root@ha-node1 ~]# pcs cluster setup hacluster host1 host2 # 동기화 설정

[root@ha-node1 ~]# pcs cluster start --all # 클러스터 시작

[root@ha-node1 ~]# pcs status # 구성 확인
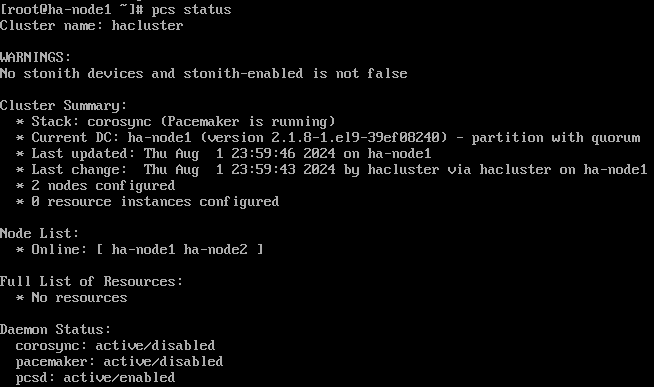
2.3) STONITH 비활성화
● Cluster 설정을 변경하기 전에 crm_verify를 사용해 유효성 검사를 해주는게 좋다고 합니다.
[root@ha-node1 ~]# crm_verify -L -V # 유효성 검사
[root@ha-node1 ~]# pcs property set stonith-enabled=false
[root@ha-node1 ~]# pcs property set maintenance-mode=true
[root@ha-node1 ~]# pcs property show
● pacemaker에서 Fencing 기능을 해주는 것이 STONITH(서비스가 중복 실행되어 충돌하는 것을 방지해주는 목적)
● Fencing이란 오류가 발생한 호스트나 리소스를 비활성화하는 기능, 해당 동작은 FenceDeivce를 통해 수행,
● Cluster를 실행하면 데이터의 무결성을 확보하기 위해 기본으로 STONITH 활성화 상태 -> 비활성화 변경
● stonith-enabled=true / maintenance-mode=false 설정을 변경하는 이유는 안전하게 클러스터 설정을 하려는 이유
● stonith-enabled 설정을 변경하면 특이사항이 발생하더라도 fencing을 통한 절체가 이루어지 않음
● maintenance-mode를 유지보수 모드로 모니터링을 중지하여 리소스 이슈 발생 시에도 리소스의 이동 불가
○ cluster 설정 작업을 모두 완료한 뒤에 필요에 따라 stonith-enabled=true, maintenance-mode=false로 변경
2.4) Cluster 통신 확인
[root@ha-node1 ~]# corosync-cfgtool -s # 클러스터 통신 확인
[root@ha-node1 ~]# corosync-cmapctl | egrep -i members # 멤버쉽과 쿼럼 확인
[root@ha-node1 ~]# pcs status corosync # corosync / 클러스터 상태 확인
[root@ha-node1 ~]# pcs status
2.5) VIP 설정
[root@ha-node1 ~]# pcs resource create VirtualIP ocf:heartbeat:IPaddr2 ip=172.31.0.30 cidr_netmask=24 op monitor interval=30s
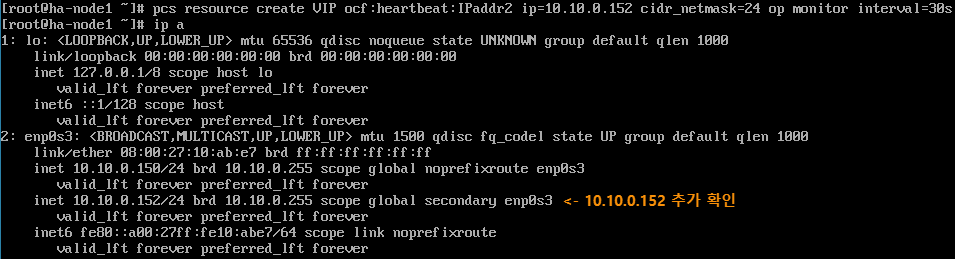
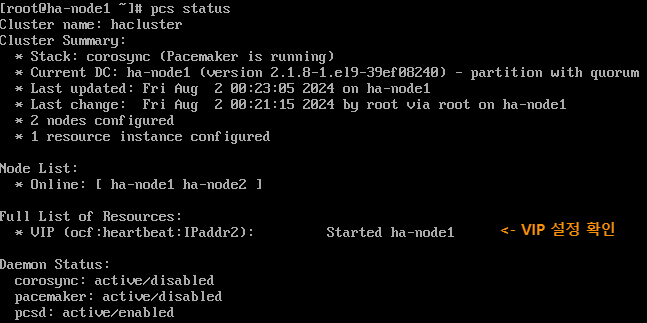
● pcs status와 ip a로 가상 IP가 잘 추가된걸 확인할 수 있다
● <ocf:heartbeat:IPaddr2>는 <resource standard: resource provider: resource 스크립트 이름> 형태
● 각 필드에 들어갈 수 있는 내용들은 아래 명령들로 확인 가능
○ pcs resource standards
○ pcs resource providers
○ pcs resource agents ocf:heartbeat
3. 테스트
3.1) Failover
[root@ha-node1 ~]# pcs cluster stop ha-node1
● node1을 종료한 후 pcs status
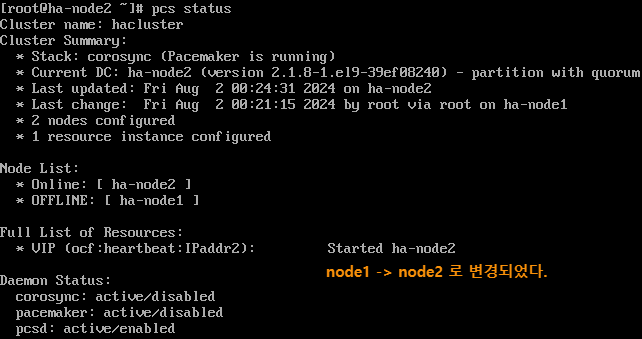
[root@ha-node1 ~]# pcs cluster start ha-node1 # node1을 재시작해도 node1로 vip가 돌아오지 않는다.
'IT > Linux' 카테고리의 다른 글
| [LINUX] 리눅스 네트워크 설정 (0) | 2024.08.16 |
|---|---|
| [OS설치] VirtualBox 사용 및 CentOS 설치 (0) | 2024.06.11 |